This site contains affiliate links to products. A commission may be received for purchases made through these links. This site is also a participant in the Amazon Services LLC Associates Program, an affiliate advertising program designed to provide a means for us to earn fees by linking to Amazon.com and affiliated sites.
Depending on where the valve switch is installed in your lamp, you may need to pass other wires through your valve. If this is the case, you may need to remove the inside of the valve to make room for the additional wires. This is done by drilling out the inside of the valve.
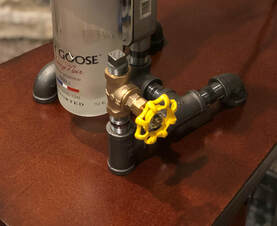
You can see from the pictures below that the inside of the valve is not completely open and some of the material needs to be removed. I suppose this can be done with a hand drill and vice. However, I always wanted a drill press so I purchased one for this task.
I bought a 9/16" hole saw with arbor that can cut metal. I removed the pilot bit because it is not needed. I tried a few different size drill bits, but they seemed to "walk" and not drill where I needed them to. This hole saw worked great and did not flex under pressure. You will need to drill out the obstructions from the left side of the valve, right side and the top.
After drilling out the guts of the valve, I cleaned up the inside with a Dremel and grinding bit, so there would not be any sharp edges that could cut the wire. I decided to tape the wires coming off of the switch just for a little added protection. Slide the wires into the valve body and reassemble the valve.
Your new valve switch can be used in a variety of pipe lamps. I have made a few pipe lamps and I can tell you people are amazed that the water valve actually turns the light on and off. Pretty cool!